Are you one of those people who are trying to create a new product? Perhaps you are seeking to improve a current product. Then consider advancing the text entry component to offer your users with beautiful content creation experience possible.
In case you didn’t know yet, WYSIWYG refers to ‘what you see is what you get.’ You might be wondering what it means. That suggests users could write it as if employing a familiar interface such as Word. The HTML is produced behind the scenes systematically. These HTML editors allow you to make web pages without understanding HTML tags. But how does it work?
These HTML editors offer a graphical interface and have a plethora of tools to create web pages. Do you have any prior experience with famous text editors like MS Word? Have you made documents with lists, tables, and images, among others? Then you’d create web pages with such editors without any hassle and fuss.
These editors are equipped with different tools, letting you add hyperlinks, lists, tables, and images with just a simple click. Many editors provide a HTML code viewer where the code of the web page is highlighted.
Nonetheless, you might notice that a few editing experiences are more WYSIWYG than others are.
Allow this post to offer you a short overview of the available options when offering the best WYSIWYG editing experience for all your users. This post will highlight the basics to getting started along with our WYSIWYG HTML editor in your apps.
Are you ready? Without further ado, let’s get started!
Simple editor
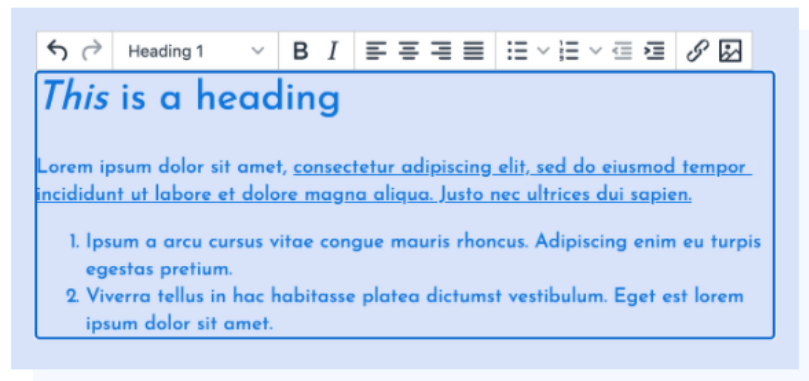
There are moments when users make content in an editor where the styling of the content is a bit basic. That’s especially true even though they don’t need to create any HTML. A good example of this editing experience might look like one below:

You see, that is a typical case, and a good way to create and design a product.
Different custom styles you can use in the editor
There are scenarios where your users will love and take advantage of an experience where the content is as near to the published content as possible.
Fortunately, the ideal WYSIWYG HTML Editors are the ones that could be configured. That enables the content in the editor to mirror the published content closely. Check out the example below:

What about inline editing?
Did you know that other WYSIWYG HTML Editors could be configured as an inline editor? Therefore, the edits could be done straight to the content without requiring you to switch between viewing and editing mode.
The toolbar in such circumstances shows typically after a text area has been chosen for editing.
Do you wish to get a bit fancy in your content? There’s no need to worry. That’s because you can have the context toolbars appear after the text is picked. It’s a one-of-a-kind experience that is familiar to Medium users.

Introducing TinyMCE
TinyMCE is an excellent WYSIWYG HTML Editor that can support all such editing experiences and so much more.
The best part about our editor is that users can engage with it with the help of standard shortcut keys and buttons. Furthermore, the corresponding HTML code is produced systematically behind the scenes. Therefore, it could be rendered in all your online apps. How amazing is that?
The editor is utilized as a text entry component in more than a hundred million products globally. You see, many developers trust it throughout the planet.
How to get started with the editor?
Obtain a free API key and try using the editor in your corresponding apps. Getting your initial example of TinyMCE running is as essential as pasting the code into an HTML file after you have an API key. You can open it up in a browser (changing no-api-key along with the API key from the account dashboard).
| <!DOCTYPE html><html lang=”en”>
<head> <meta charset=”utf-8″> <meta name=”viewport” content=”width=device-width, initial-scale=1″> <script src=”https://cdn.tiny.cloud/1/no-api-key/tinymce/5/tinymce.min.js” referrerpolicy=”origin”></script> <script> tinymce.init({ selector: ‘#mytextarea’ }); </script> </head> <body> <h1>TinyMCE Quick Start Guide</h1> <form method=”post”> <textarea id=”mytextarea”>Hello, World!</textarea> </form> </body> </html> |
Just keep in mind that you’ll be given with a warning alert: This domain is not registered with Tiny Cloud. That alert will appear, especially if you’re running TinyMCE on the local machine outside of a web browser. You will come across that warning notification if the domain on which you are running the editor isn’t registered over the account.
Do you wish to get rid of that notification? The process is quite simple, though. Here’s what you need to do:
- Open it on localhost that is approved domain by default already or;
- Register the domain as an approved domain in the account
What to do after?
Let’s say you have TinyMCE running through default configuration. The next thing you need to do is to personalize it to fit the particular UX you wish to offer within your products.
Improve the entire WYSIWYG experience
Here are useful tips you can try to improve the experience:
- Get started with inline editing
- Personalize styles in the editor to complement the published content
Modifying features and user options
Did you know that TinyMCE is flexible and powerful at the same time? It allows you to configure it with as few or as many options as you want. Try to research more to learn more details about ways you can personalize your TinyMCE toolbar.
Incorporating with your preferred frameworks
The best part here is that it is simple to incorporate your TinyMCE with any of your preferred frameworks after you’ve got it up and running. Isn’t it amazing?
For a smooth and flawless process, make sure you do some research. Doing so will guarantee you are adequately equipped in the process.
What are your thoughts about this post on WYSIWYG HTML Editor? We’d love to hear your insights! Feel free to leave your comments down below!